Now, let's take it a little further and set the car robot free to roam around. The car in this article is built using the small booklet which is delivered with the Lego kit. Now think, what if the robot collided with an obstacle! There comes the role of a touch sensor. Touch sensor gives the robot a sense of obstacle on its path. The sensor communicates this information to the NXT. NXT then decides what action to take, if an obstacle is present. So, lets take a look into the NXT program to observe the robot's behavior in the free world! In this project, the robot handles two distinct situations.
- If there is an obstacle present on the path, (as realized when Touch Sensor is pressed), do the following
- Make the robot go reverse
- Take a turn to move away from the obstacle
- There is no obstacle, (as realized when Touch Sensor is in released or bumped state)
- Keep the robot moving forward
Click on the Switch Box to see its configuration panel at the bottom of the screen (Please check the above figure). As per the configuration, please make sure that the sensor is selected to be Touch Sensor and the sensor is connected to port number 1 of NXT brick. The action is selected to be pressed. That means we have configured the upper part of Switch box if touch sensor is in pressed condition and below part of the Switch box is configured for sensor to be in other conditions, which are released or bumped. Drag and Drop the Motor Box from the left palette, over to the upper part of the Switch Box. Click on the Motor Box to see its configuration panel at the bottom of the screen. Configure this panel to make the car go reverse, when the obstacle is found and Touch Sensor is pressed. Please power on the motors B and C to go into reverse direction for 2 seconds. Keep rest of the configuration as it is. The below figure shows the configuration panel for the motor box for my car.
Drag and drop another Motor Box in the upper part of the Switch Box, and place it next to the previous Motor Box (which we used for reversing the car). Click on this box and see its configuration panel at the bottom. Configure this Motor Box to take a turn. In order to take a turn, powered on only one motor (in my case Motor B) in reverse direction for 1 second. This will make the car move away from the direction of the obstacle. Please check the below figure for the configuration of this second Motor Box.
Now drag and drop the third Motor Box in the lower part of the Switch Box, which will function in all other states of the touch sensor except pressed state, for example Bumped and Release state. This box will keep the car moving forward in the default conditions. Please check the figure below.
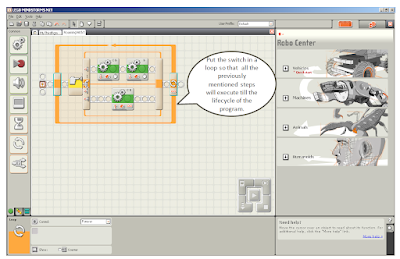
Click on this third Motor Box and check its configuration panel below. I have configured it for my car to power on the Motors B and C to move in forward direction for unlimited duration. Now is the time to put the entire switch in a loop which will help the car to execute all previously defined steps forever. Please check the figure below. Click on the loop and we get the Configuration Panel of the loop at the bottom. Please select forever, in order to keep the car moving for its entire lifecycle.
Download the program on to NXT brick and observe the movement of the robot. I have recorded the movement of my robot in a small clip below.
As you can view from the clip, the robot encounters three obstacles on its way. On every occurrence of obstacle, the robot reverses, then it makes a turn and then start moving forward. Hope you enjoyed this article!


No comments:
Post a Comment