1. HC-05 and Arduino Connectivity for AT mode
- Connect 5v to 5v
- Connect GND to GND
- Connect Tx to pin 2
- Connect Rx to pin 3 and GND through resistors (2k and 1k) as shown below
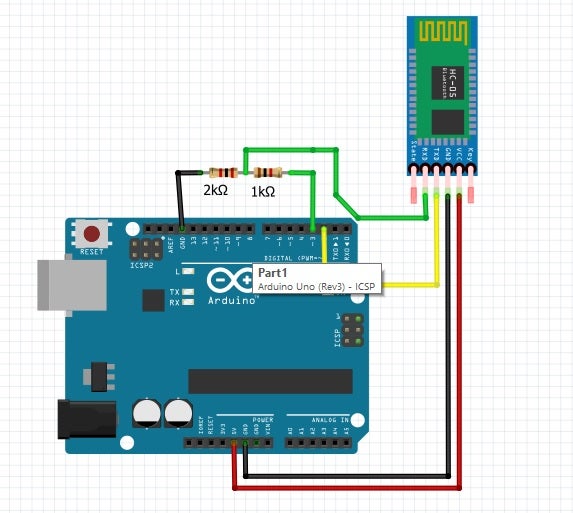
- EN and state pins remain hanging
- Remove the 5v connection to HC-05
- Remove the connections to Pin 2 and 3 of arduino
- Connect the arduino to PC to power on using USB
- Upload the sketch below
#include <SoftwareSerial.h>
SoftwareSerial BTserial(2, 3); // RX | TX // Connect the HC-05 TX to Arduino pin 2 RX.
// Connect the HC-05 RX to Arduino pin 3 TX
char c = ' ';
void setup() {
Serial.begin(9600);
Serial.println("Arduino is ready");
Serial.println("Remember to select Both NL & CR in the serial monitor");
// HC-05 default serial speed for AT mode is 38400
BTserial.begin(38400);
}
void loop() {
// Keep reading from HC-05 and send to Arduino Serial Monitor
if (BTserial.available()) {
c = BTserial.read();
Serial.write(c);
}
// Keep reading from Arduino Serial Monitor and send to HC-05
if (Serial.available()) {
c = Serial.read();
BTserial.write(c); }
}
- Keep holding the button on HC-05
- Connect 5v to 5v, the HC-05 will go into AT mode
- Release the button on HC-05
- Reconnect hc-05 to pin 2 and 3
- Execute the following AT commands through serial monitor (make sure the baud rate is set to 9600 and line endings is set to be "Both NL & CR")
- AT+ROLE=0
- AT+POLAR=1,0
- AT+UART=115200,0,0
- Remove the USB connection to arduino
- Power arduino with AA cells (4.8 v)
- From the Control Panel select Add a Device.
- Add the Bluetooth module.
- Select enter pairing code option.
- Enter "1234" for the pairing code.
- At the Add a device success window, click Close.
- Device ready to use. The OS will create two serial COM ports associated with the device. Always use the one with the lower number.
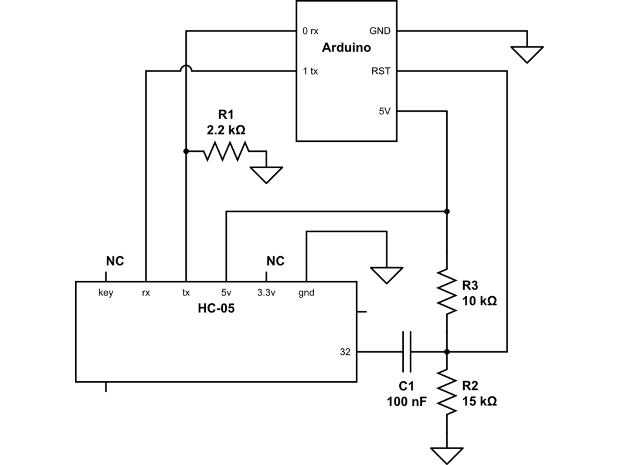
3. Solder a jumper onto Bluetooth module on Pin 32
4. Build ONLY the RESET pin connections and change pin 2 and 3 connections to pin 0 and 1 respectively as shown below - keeping rest all the above circuit the same
5. Program arduino with Bluetooth.
6. References
http://www.joshuanewell.com/electronics/arduino-programming-via-bluetooth
https://create.arduino.cc/projecthub/youssef-sabaa/arduino-bluetooth-programming-shield-wireless-upload-code-1a397c
https://www.instructables.com/id/AT-Commands-for-Bluetooth-Module-HC-05-W-EN-Pin-an/
http://www.martyncurrey.com/arduino-with-hc-05-bluetooth-module-in-slave-mode/
No comments:
Post a Comment